Wireless mice have become an integral part of our computing experience, offering convenience and freedom of movement. However, just like their wired counterparts, wireless mice also require regular maintenance to ensure optimal performance and longevity. Over time, dirt, sweat, and grime can accumulate on the surface, affecting both the aesthetics and functionality of the mouse. In this comprehensive guide, we’ll walk you through the steps to effectively how to clean a wireless mouse, ensuring it remains in top-notch condition.
Table of Contents
- Introduction
- Gather Your Cleaning Supplies
- Power Off and Unplug the Mouse
- Cleaning the Exterior
- Mouse Surface
- Buttons and Scroll Wheel
- Cleaning the Sensor
- Reassembling and Testing
- Preventive Maintenance Tips
- Frequently Asked Questions (FAQs)
- Conclusion
1. Introduction
A clean wireless mouse not only looks better but also performs better. Regular cleaning can prevent erratic cursor movements and maintain a comfortable user experience.
2. Gather Your Cleaning Supplies
Before you begin, collect the following supplies:
- Isopropyl alcohol (70% or higher)
- Microfiber or lint-free cloths
- Cotton swabs
- Soft bristle brush
- Compressed air canister
3. Power Off and Unplug the Mouse
Make sure the mouse is powered off and disconnected from your computer before cleaning.
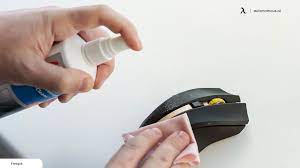
4. Cleaning the Exterior
Mouse Surface
- Dampen a microfiber cloth with isopropyl alcohol.
- Gently wipe down the surface of the mouse, removing fingerprints and dirt.
Buttons and Scroll Wheel
- Moisten a cotton swab with isopropyl alcohol.
- Carefully clean the buttons and scroll wheel, ensuring you remove grime and debris.
5. Cleaning the Sensor
- Use compressed air to blow away loose particles around the sensor area.
- Dampen a cotton swab with isopropyl alcohol and gently clean the sensor. Avoid excessive moisture.
6. Reassembling and Testing
- Allow the mouse to dry completely before reassembling.
- Plug in the wireless receiver and turn on the mouse.
- Test the mouse’s functionality to ensure accurate tracking and responsiveness. More
7. Preventive Maintenance Tips
- Clean your wireless mouse every few weeks to prevent dirt buildup.
- Store the mouse in a clean environment when not in use to minimize debris accumulation.
8. Frequently Asked Questions (FAQs)
- Can I use water instead of isopropyl alcohol for cleaning? Isopropyl alcohol is recommended for electronics cleaning to avoid residue.
- Is it safe to clean the sensor with a cotton swab? Yes, a cotton swab is safe for cleaning the sensor if used gently.
- My mouse buttons feel sticky. How can I clean them? Dampen a cloth with isopropyl alcohol and wipe the sticky areas carefully.
- How often should I clean my wireless mouse? Cleaning every few weeks or as needed is recommended.
- My mouse is still not working correctly after cleaning. What should I do? If issues persist, consider contacting the manufacturer for support.
9. Conclusion
Regular cleaning is essential to maintain the performance and lifespan of your wireless mouse. By following this step-by-step guide and practicing preventive maintenance, you can ensure your wireless mouse remains a reliable and efficient companion for your computing tasks.